About Me

Saturday, December 22, 2012

Peppermint Rosette Cake

(With no mint flavor!)


Over this past year there has been thousands of cakes inspired by this one by I am baker.

I thought that Christmas Eve would be the perfect occasion to debut a version of this cake, but then the question arose: what colors? Green? Red? White?
Green would be too grinch-y. All red would be more for valentine's day. Not to mention that red is a super tricky color to make (remember the Minnie Mouse cookies with the black icing? Well we don't want that to happen with red!). So what about white and red striped like a candy cane? Yes! It will look like peppermints without being minty flavored (the hubby hates mint). But if you wanted to you could add a hint of mint extract to the frosting or cake. Seeing as not everyone likes mint in my family, I'm making it simple.

Keep in mind I'm not making buttercream frosting from scratch. My husband is a couponer. And he is VERY good at it. Therefore I have a TON of frosting, cake mixes, cookie mixes and everything else in the WORLD in my pantry, or as he likes to call it: the stash.

So here is what i'll be using:


  • 1 box cake mix of your choice
  • 2 cans of Cream cheese frosting
  • confectioners sugar (sifted)
  • 8 inch pan
  • Red gel food coloring


1. Start by baking your cake layers (I'm making 3). Let them cool completely.

2. Once cooled, using a long serrated knife, slice off the top part of the cake until even. You don't want to have a lopsided cake!

3. In a stand mixer, whip entire can of frosting for about 4 mins. To make the frosting stiffer for the rosettes, add 1/4 cup of powdered sugar at a time until you get the desired consistency.
4. Add a very thin layer of frosting to the cake (crumb coating), but thick enough so you can not see your cake underneath. Place in the fridge until the frosting has set.

5. Draw 2 vertical lines with a paintbrush or toothpick on the inside of your piping bag from the tip to the end of the bag. Carefully add white frosting with added powdered sugar.
6. Starting at the bottom, pipe each rosette starting at the same place each time. Pipe, move in a circular motion, release pressure and lift. Make sure that your rows are tight, and slightly overlap to avoid open spaces.


Here is how it turned out:


Turned out alright. Good practice for next time!

Friday, December 21, 2012

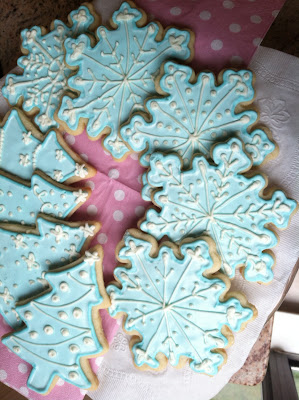
Blue Christmas Cookies


The last time I tried to make sugar cookies I basically blew it. The task was Minnie Mouse cookies, but I promised my husband's little brother that I would make them eggless (food allergies). Well as it turned it out, they weren't actually eggless because of the meringue powder I used in the frosting (i definitely had a 'DUH!' moment), and they turned everyones teeth black. My hand may have slipped a little on the gel coloring...oops...

Anyway I felt the need to make these cookies especially pretty and delicate looking to make up for the Minnie cookie incident.

Here is what you'll need:


  • Sugar Cookie Mix (or Sugar Cookie Recipe)
  • 1 Egg
  • 1/2 cup Butter, Melted
  • 1 tablespoon all-purpose flour
  • 1 can vanilla frosting 
  • Neon blue food coloring
Directions:

  1. Preheat the oven to 375 degrees. In a medium bowl, combine all of the ingredients until a dough forms. 
  2. On a floured surface, roll out dough until it is approximately 1/4 inch thick. 
  3. Using any kind of cookie cutter to make shapes. (I used snowflakes, trees, and stars)
  4. Bake for 8 minutes (This really depends on how you like your cookies, I like them soft in the middle. If you like them sort of crunchy bake them longer.) Let them cool completely. 
    5. In a stand mixer with a whisk attachment, whip frosting for 4 minutes. This will add more air and increase the amount of frosting. 
    6. In a separate bowl with about half the frosting, add 1 TINY drop of neon blue food coloring, mix. 
    7. Using a # Tip pipe the outline of the cookies. Allow the outline to set for several minutes before 
filing.


     8. Add 1 tsp. of water at a time, to the blue frosting until you get a consistency like honey, or shampoo. Using a decorating bottle, fill the cookies. Pop any air bubbles with a toothpick!


9. Let the cookies set overnight! Keep the white frosting in a bowl covered with a damp paper towel in the fridge. Make sure you let the frosting come to room temp before piping. 
10. Using a # Tip pipe different designs on your cookies, or the same one if you're not feeling so creative. Let them set, or enjoy =)

Here is how mine turned out. As you'll notice none of the stars made it to the final round of decorating...


Thursday, December 20, 2012

Christmas M&M Cookie Bites


I have been dying to make something in my new Brownie Mold,


but my last dessert was Brookies so I thought I would change it up a bit and make bite sized cookies! Here's what you'll need:

  • 1 bag of your favorite chocolate chip cookie mix, or your favorite recipe (I will share with that you on another post). 
  • 1/2 cup milk chocolate m&m's 
  • 1 egg
  • 1/2 cup (1 stick) butter 
  • 1 bag of dark chocolate candy melts or 1 bag of dark chocolate chips

Preheat the oven to 375. Spray your silicon mold with baking spray (if you don't have the mold you can use a nonstick brownie pan). Using a stand mixer, add cookie mix, butter, and egg and mix. Don't over mix! 


Fold in about a 1/2 cup (this amount is really up to you) of coarsely chopped m&m's with silicon spatula. 


Next, using a 1 tablespoon size cookie scoop, spoon 1 tablespoon into each mold square. 


Bake for 13 minutes or until light golden brown. Let them cool completely before removing them from the mold. 


They will come out upside down so make sure that you flip them over before decorating. 


Line a baking sheet with parchment paper and place cookie bites in rows. Put candy melts in the microwave for 1 minute.

I have a very handy decorating bottle that i use to drizzle the chocolate, but you could easily snip the end of a ziploc bag. It does the same job! 
I also added nonpareils in green and red to keep it christmas-y! 


Here is the finished product:


They are just the right size, only a couple of bites. Perfect for a holiday party, or a midnight snack! 
I packaged up mine up in cookie bags I found at the local Michael's and tied it up with ribbon. I gave them out as a holiday treat for basically anyone who I was seeing that day!